anchorYou might want to read this if
- You would like to create your own website/blog (if you decide to use Ember.js maybe you can get ideas from here)
- You already know React, and you are curious about Ember.js.
anchorThe start
In 2013, I embarked on my first blogging journey on Blogspot. It lasted for two years, but as university life took over, my time became limited, and I gradually lost touch with that blog. Nonetheless, I still longed for a space on the internet where I could freely express my thoughts. As my career in the tech world progressed, I knew it was time to build my own website.
The amount of different tools for creating a website and the fact that I had never done one on my own before, felt overwhelming. I shared my issues with my working colleague, Chris. From that day forward, we began scheduling weekly pair programming sessions. Chris became my accountability partner and mentor, bringing immense value to my journey. 💜
Working at a consultancy company like Mainmatter means that you don't always collaborate with everyone on the team. Chris and I never had the opportunity to work together on a client project. I really enjoyed having the chance to collaborate with someone outside of my usual circle. As a junior developer, these sessions have proven to be incredibly valuable for me.

anchorFrom React to Ember
When I joined the company, I initially worked with React, and I was the only one who didn't have experience working with Ember. This sparked my curiosity to learn at least what it looked like.
Chris has been working with this framework for 10 years, so starting those pair programming sessions with him seemed like the perfect way to start learning Ember.
anchorDesign Mockups
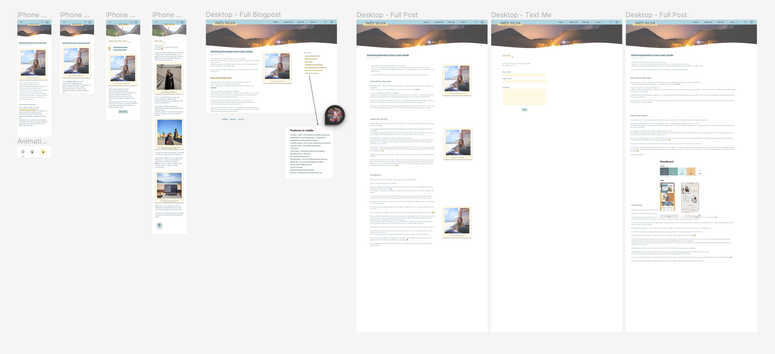
To me, designing a mockup of the website was an important step to kick off the project. It helped me visualize my ideas of what I wanted the website to look like. It got me learning a bit more about UI/UX, and I used Figma as a sketching tool. I've worked with Sketch on other projects, but I still find Figma easier to use and more intuitive. I collected some inspiration and colors I liked. Then I started with the landing page, and I kept going from there.
Florian from our team (our design ninja) gave me a tip to use actual content on my mockups instead of using the classic 'Lorem Ipsum' placeholders - you better perceive the distance between the elements and how the font feels with your text.

anchorCoding
To begin the coding journey, I followed the quick start guide. I created my first route - an 'About Me' page, made my first component - <Header>, and my first routes navigation Home ↔ About Me.
My first coding challenge was ‘How to create a dropdown in Ember?’. (now I’m having flashbacks from whenever I asked Chris how do you do this in Ember?, he would answer There is no such thing as "in Ember". This is just javascript. 😆)
As I transitioned from working with React to Ember, I noticed a shift in thinking. Ember introduced me to the handlebars templating language and a different project structure, where each component had its dedicated folder containing adapters, controllers, models, and templates. It felt a bit overwhelming initially, especially compared to React, where all the logic sometimes resided in a single file.
Another challenge I encountered was finding updated documentation. When googling my struggles, I often stumbled upon outdated resources or, in some cases, no solutions at all. The Ember community, being smaller than the React community, naturally had fewer online resources, which increased the learning curve for a beginner like me.
Overall, my transition from React to an Ember project proved to be a valuable learning experience, allowing me to explore new perspectives and expand my skill set.
anchorFirst Coding Challenge
Picking up the question from my 1st coding challenge. I made that dropdown 🙌🏼 and here is what it looks like:
// dropdown.hbs
<div class="dropdown">
<button
class="dropdown-button "
type="button"
>
<img class="dropdown-icon " />
</button>
<div class="dropdown-list ">
</div>
</div>
//dropdown.js
import Component from "@glimmer/component";
import { action } from "@ember/object";
import { tracked } from "@glimmer/tracking";

export default class Dropdown extends Component {
  @tracked open = false;

  @action
  dropdown() {
    this.open = !this.open;
  }
}
// header.hbs
<Dropdown @title="Blog">
<LinkTo class="dropdown-text" @route="posts"> All Posts</LinkTo>
<LinkTo class="dropdown-text" @route="posts.category" @model="travel">
Travel</LinkTo>
<LinkTo class="dropdown-text" @route="posts.category" @model="tech">
Tech</LinkTo>
</Dropdown>
I mean, for someone coming from React, there was a lot of new stuff going on in these two files.
Also, going back to using the this. keyword brought me memories from my classes at university and how understanding this concept was the boss level of object-oriented programming. 😂
Let me break down what is happening in my <Dropdown>:
Note, I want to say that this is probably not the most helpful dropdown component since I can only its title is customizable. In my case, I ended up not reusing it, so I didn’t feel the need to make it more customizable.
- My dropdown component has a button that renders a
{{@title}}. In React, this would be theprops.title. - Then I have a
<div>that will receive{{yield}}. This was a new keyword for me as well. The yield acts like a placeholder, and if I use<Dropdown>in another component, which is the case in the header.bhs, what I pass within the open and closing tags of my component will be rendered in the place of{{yield}}. The equivalent of this in React would be the “children” property. - In here
class='dropdown-button {{if this.open "focus"}}', I’m dynamically changing the button class name so that when the open variable is set to true, I add ‘focus’ to the class name, which is how I apply the yellow color to the dropdown title when the user opens it. Same happens with<div class='dropdown-list {{if this.open "show"}}'>. - Next, we have
{{on 'click' this.dropdown}}, this instructs my app to run thedropdown()function (defined in the dropdown.js file) after the user clicks on the button. - Time to dive into dropdown.js file associated to my component:
- Pretty much all my components have these 3 imports in their javascript files:
Componentis a class from the Glimmer library (DOM rendering engine made by the ember team) that allows me to define the behavior of my component and its UI logic. In the latest versions of React, functional components were introduced, meaning that they can be defined using regular JavaScript functions - this way, there is no need to extend a class from a Component base class.{action}is a decorator coming from the@ember/objectmodule. It is Ember's own object model, it allows me to define an event handler, in this case, thedropdown()function that gets triggered when the user clicks on the button.@actionhere works similarly tobind()in JavaScript - when I usethis.openinside of my Dropdown class in the dropdown.js file, I need to find a way to make surethisrefers to the same context as the one used in the template (Dropdown.hbs file), and@actiondoes this for us. This way, when calling thedropdown()function from the template the right context (this) gets passed to it. React doesn't have decorators in their official API, we typically use regular functions as event handlers directly.- And the last import
{tracked}from@glimmer/tracking. This is a module provided by glimmer framework that tells my code to keep an eye on a variable, in my case, the variable "open". This way, my app knows that when the value of this property changes, changes in the UI will be triggered. In React, we typically achieve this functionality using the built-in state management and theuseStatehook. In my website this translates to - whenever a user clicks on the button, the value of the tracked variable changes, which controls the visibility of the dropdown's children and applies specific CSS classes.
- Pretty much all my components have these 3 imports in their javascript files:
- Finally, it's time to look at the last file - the template where I use my
<Dropdown>component, header.hbs.:- I’m passing to the
<Dropdown>a list of<LinkTo>. The latter component allows me to create a link to a route, while the@modelargument, allows my app to know which data to retrieve when clicking on that route.
- I’m passing to the
anchorRendering My Blogposts
Finding a tool to publish my posts
After giving the shape I wanted to my website, the question for one of the key features was: "How do I create a not-so-complicated system that allows me to publish blog posts? Am I going to create HTML pages every time?"
Chris proposed an approach: "Let’s create posts using markdown files." He said we could use
ember-cli-showdown.This addon converts my markdown into HTLM, so I don’t need to do the tedious & time-consuming job of writing an HTML file every time I want to publish a new post. It was a deal. 🤝
Combining my posts information with the tool
"How can I extract what I write in my markdown files into my HTML templates?" Another plugin enters the room: welcome to Broccoli-Static-Site-Json. 👋🏼 It generates a JSON API of the content of my markdowns. Let me guide you through the process:
- I need to define what data will populate my JSON API and to do it, I define a ‘Post’ model. It looks like this:
//app/models/post.js
import Model, { attr } from "@ember-data/model";
export default class PostModel extends Model {
  @attr title;
  @attr("date") date;
  @attr category;
  @attr description;
  @attr image;
  @attr content;
  @attr header;
}
Now that I have that defined, I need to tell the broccoli addon what attributes to use when building the JSON API.
Let’s add that in
/lib/content-generator/index.js(a file coming from the in-repo Ember addon that you can use to add broccoli-static-site-json to your project)://lib/content-generator/index.js const postsTree = new StaticSiteJson("data/post", { type: "post", contentFolder: "data/posts", attributes: ["title", "date", "category", "image", "description"], collate: true, });I start by specifying the location of the API information, which, in my case, is stored in my markdown files located under 'data/post'.
The 'type' parameter defines the name of the JSON:API document. The name you assign to the 'type' parameter gets pluralized, so for the next attribute, it should be 'data/posts'. Next, I define the attributes I want to include. Additionally, I utilize the last configuration variable,
collate, which allows me to query all of my content at once, using 'findAll'. This is particularly useful when I need to retrieve all posts. Now, let's move on to the fun part 🙌🏼 - creating a template that will structure the information from the markdown files. We'll then utilize our newly created API to populate the template. To exemplify this, I'm going to show mypost-previewtemplate:
anchorWhat they see

<PostPreview>component
anchorWhat I see
//app/components/post-preview.hbs
<article class="blogpost-preview">
<div class="blogpost-header">
<Category @icon= @text= />
<LinkTo
class="link"
aria-label="Read more about "
@route="posts.post"
@model=
>
<h1><span></span></h1>
</LinkTo>
</div>
<div class="blogpost-body">
<p class="blogpost-description"></p>
<PolaroidImage
@src="../../assets/images/"
@description="post created on "
/>
</div>
</article>
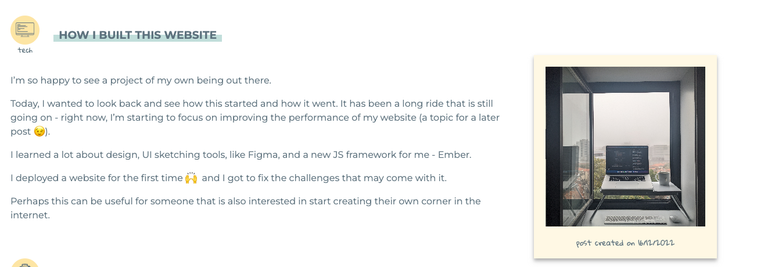
And this is the frontmatter of the markdown file for that blogpost preview:
---
title: How I Built This Website
category: tech
description: "<p> I’m so happy to see a project of my own being out there. </p>
<p> Today, I wanted to look back and see how this started and how it went.
It has been a long ride that is still going on - right now, I’m starting to focus on improving the performance of my website (a topic for a later post 😉). </p>
<p> I learned a lot about design, UI sketching tools, like Figma, and a new JS framework for me - Ember. </p>
<p> I deployed a website for the first time 🙌  and I got to fix the challenges that may come with it. </p>
Perhaps this can be useful for someone that is also interested in start creating their own corner in the internet."
image: "foggy-work-day.jpg"
date: 2022-12-16T00:00:00.000Z
---
This is information that all the posts will have - title, category, description, image and date. I’m keeping this as Frontmatter (metadata in Markdown files) because when my markdown is being converted into static JSON, each of my frontmatter keys will become keys in the JSON API. This way, I can access their data from my templates, e.g {{@post.category}} , {{@post.image}}.
anchorDeploying
“Ok, I have the main functionalities running and my design is more or less close to what I sketched, time to make it public 😱”. It is very easy to fall in a situation where we say to ourselves that a project is still not ready to be shipped. There was a moment where Chris made me wear my Product Manager hat, and told me: "Write down the minimum features you need to make it functional till you deploy it”. This help me prioritize what I really needed and keep my focus.
I got myself a domain at namecheap and I used netlify to deploy it.
I faced some challenges with the deployment:
- Image fingerprinting The photos were not loading on the deployed website. Why? Ember was adding a hash to my photo sources, e.g - from ‘work-in-cv.jpg’ it would become ‘work-in-cv-h4323524hgs.jpg’. In my HTML the photo source would still be the one without the hash, but that path would not exist anymore. How did I fix it? I specified on ember-cli-build what type of files I wanted to get fingerprinted:
//ember-cli-build.js
module.exports = function (defaults) {
  let app = new EmberApp(defaults, {
    // Add options here
    fingerprint: {
      extensions: ['js', 'css', 'map'], //remove photo formats from here
    },
  }
}- Routes were not found
Ember is a SPA (Single Page Application)- it loads a single HTML page and then dynamically updates its content as the user interacts with the application without requiring full page reloads from the server each time. Therefore SPA websites provide a smoother user experience.
The downside of this approach is that if we directly request to the web server a specific URL, e.g., /blog/post, the server won't find a file at the specified path and responds with a 404. This happens because the server is only aware of the index page and serves this page for all URLs within the application. It is Ember's JavaScript code that takes care of rendering the appropriate content based on the requested route.
To handle direct URLs requests to the web server, there are two approaches:
- Creating HTML files in the paths of the routes.
- We tell Netlify to give us the index.html when we get a 404 error, and Ember decides what page we will render.
I chose the first solution - it is better for content websites, and we want SEO (Search Engine Optimization).
To help me with this, let me introduce another addon, Prember. You just need to tell Prember which URLs you want converted into static HTML websites, and the addon does it for you in build time.
Here is how I specified them:
//ember-cli-build.js
const fs = require("fs");
let posts = fs.readdirSync("data/post").map(file => {
  return `posts/${file.replace(/\.md$/, "")}`;
});

module.exports = function (defaults) {
  let app = new EmberApp(defaults, {
    prember: {
      urls: ["/", "/about-me", "/contact", "/posts", ...posts],
    },
  });
  return app.toTree();
};
How do I keep Prember aware of the URLs of my posts (since I’ll keep adding new ones)?
I built a function to help me with this, which you can see in the code above:
//ember-cli-build.js
let posts = fs.readdirSync("data/post").map(file => {
  return `posts/${file.replace(/\.md$/, "")}`;
});
I create a posts array that is populated with all the files I have under data/post directory. I make some changes before I save it to my array, the files there look like this working-from-cv.md, I remove the .md and I attach posts/, so at the end I have an array of the URLs to my posts that look like this posts/working-from-cv.
Now, I just need to add the array containing all the URLs to my posts with all the other URLs for the other pages - urls: ['/', '/about-me', '/contact', '/posts', ...posts], with …posts, javascript will deconstruct my array and add its values to the urls array.
anchorMy Thoughts About This Project
Seven months have passed since I released my website.
It was rewarding to learn and use my current knowledge to create a website that would match my personality: it felt like decorating a house. 😆 I started by collecting inspiration from other websites, then I sketched how I wanted the pages to look in Figma, and finally, I started coding. Having the sketches in the first place helped me a lot throughout the process. I also realized that some design choices were harder to implement than I thought, so I kept embracing some improvisation. 😅
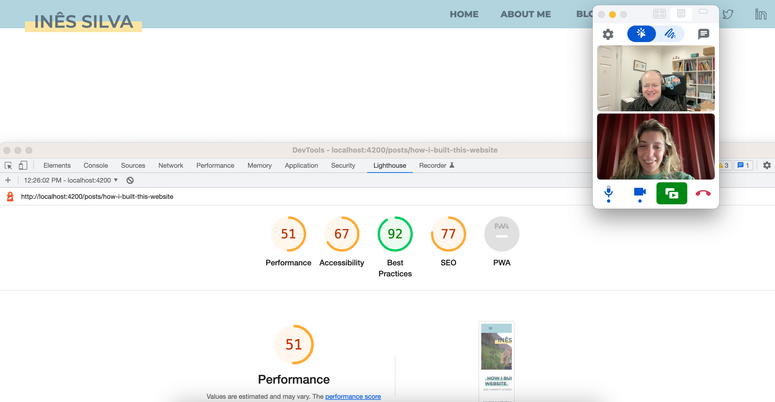
After I deployed it, I made some improvements, primarily related to the performance. By running Lighthouse, I saw that my biggest issue was not being efficient when loading my images. I recently added a little reaction button at the end of my posts. (inspired by Josh Comeau's website).
I don't have a long experience in web development, so for me, going from react to ember it wasn't the smoothest transition as I found Ember a bit harder. I guess every framework has its pros and cons. In React, dealing with component states can become messy; in Ember, you don't need to care about it. In Ember, having all these separate files that target the same page can create confusion - controllers, .js, .hbs. However, some people prefer this approach. In the end, choices like these are very subjective.
Ember has a more traditional approach to object-oriented programming. It resembled what I learned at university way more.
Regarding the type of project I built - a personal website/blog. I might be falling into the group of the people who create a blog and never post on it. 🙈 I think I put a lot of pressure when I start working on a post, and I made them very long - this adds friction to posting regularly. Also, when I designed how to present the information, I just kept long posts in mind.
My pieces of advice are: choose a publishing tool that is easy enough - the markdown files approach is working well for me; when sketching your website, keep short posts in mind as well.
Since almost every human is an internet user nowadays, it is nice to have your own website where you can share your work and interests - you can end up meeting more people with the same interests as you and possibly initiate cool work collaborations.
If you want to check my internet corner you can access it here, there you can find another blog post about my journey building the project. What are your thoughts about having a personal website? Feel free to reach out to me with feedback or to discuss about this topic. 😄👋🏼

